
Blog
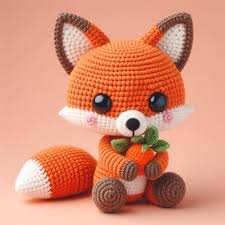
How to Make a Crochet Fox Toy


Eames plastic side chair
$99.00


Ornare auctor
$429.00

Panton tunior chair
$199.00

Smart watches wood edition
$599.00


This is custom heading element
orem Ipsum is simply dummy text of the printing and typesetting industry. Lorem Ipsum has been the industry’s standard dummy text ever since the 1500s, when an unknown printer took a galley of type and scrambled it to make a type specimen book. It has survived not only five centuries, but also the leap into electronic
orem Ipsum is simply dummy text of the printing and typesetting industry. Lorem Ipsum has been the industry’s standard dummy text ever since the 1500s, when an unknown printer took a galley of type and scrambled it to make a type specimen book. It has survived not only five centuries, but also the leap into electronic
Author

Author Name
Crocheting a fox toy can be a fun and rewarding project, especially if you’re a fan of woodland creatures! With its vibrant orange fur, pointy ears, and bushy tail, a crocheted fox makes a perfect gift, a cozy home decor item, or a charming addition to a toy collection. In this guide, I’ll walk you through the process of creating your very own crochet fox toy from start to finish. Whether you’re an experienced crocheter or just starting out, this project is achievable and enjoyable.
What You’ll Need:
Before we get started, gather all the materials you’ll need for this project:
-
- Yarn:
-
- Main color: Orange (for the body)
- Accent color: White (for the belly, paws, and tip of the tail)
- Black (for the eyes and nose)
- Light pink or beige (optional, for the inner ears)
-
- Crochet Hook:
Use a 3.5mm (E) hook for most of the project, but you might want to use a smaller hook for finer details like the nose and eyes. - Stuffing:
Soft polyfill or cotton stuffing to give your fox some shape. - Safety Eyes or Black Yarn:
If you’re using safety eyes, select a pair of 12mm or 15mm. If you’re crocheting the eyes, you can use black yarn. - Tapestry Needle:
For sewing the parts together and weaving in loose ends. - Stitch Marker:
To mark the beginning of each round.
- Yarn:
Crochet Stitches You’ll Use:
-
- Chain (ch)
- Slip Stitch (sl st)
- Single Crochet (sc)
- Increase (inc): Work two single crochets in the same stitch.
- Decrease (dec): Work two single crochets together.
If you’re unfamiliar with any of these stitches, there are plenty of video tutorials available online to help you learn!
Step-by-Step Guide to Crocheting Your Fox Toy
1. Crochet the Head
Start by crocheting the fox’s head. We’ll use the orange yarn for the majority of the head and finish with the white yarn for the muzzle.
Round 1:
Make a magic ring and crochet 6 single crochet (sc) into the ring. (6)
Round 2:
Increase in each stitch around (12)
Round 3:
1 sc, 1 inc around (18)
Round 4:
2 sc, 1 inc around (24)
Round 5-10:
Work 1 sc in each stitch around (24)
Round 11:
2 sc, 1 dec around (18)
Round 12:
1 sc, 1 dec around (12)
Round 13:
Dec around (6)
Stuff the head with your polyfill as you go to ensure it holds its shape.
Finish off and leave a long tail for sewing.
2. Crochet the Body
Now, let’s work on the fox’s body, starting with the orange yarn.
Round 1:
Make a magic ring and crochet 6 sc into the ring. (6)
Round 2:
Increase in each stitch around (12)
Round 3:
1 sc, 1 inc around (18)
Round 4-9:
Work 1 sc in each stitch around (18)
Round 10:
1 sc, 1 dec around (12)
Round 11:
Dec around (6)
Stuff the body with polyfill and finish off, leaving a long tail for sewing.
3. Crochet the Ears (Make 2)
For the fox’s adorable pointed ears, use a combination of orange and white yarn.
Round 1:
Make a magic ring and crochet 4 sc into the ring (4)
Round 2:
1 sc, 1 inc around (6)
Round 3:
1 sc, 1 dec around (4)
Fasten off and leave a tail for sewing. Crochet a second ear the same way.
4. Crochet the Tail
The tail is what makes the fox extra special! It’s bushy and curled at the end, just like a real fox.
Round 1:
Make a magic ring and crochet 6 sc into the ring. (6)
Round 2:
Increase in each stitch around (12)
Round 3-7:
Work 1 sc in each stitch around (12)
Round 8:
1 sc, 1 dec around (9)
Round 9-12:
Work 1 sc in each stitch around (9)
To create a fluffy, tapered tail, stuff lightly and then gradually decrease as you approach the tip.
Finish off and leave a long tail for sewing.
5. Crochet the Paws (Make 4)
The paws are small, cute, and make the fox more lifelike.
Round 1:
Make a magic ring and crochet 4 sc into the ring. (4)
Round 2:
Increase in each stitch around (8)
Round 3:
1 sc, 1 dec around (6)
Fasten off and leave a long tail for sewing. Crochet four paws in total.
6. Assemble the Fox
Now it’s time to bring all the parts together! Start by attaching the head to the body using the yarn tail, sewing around the neck area. Be sure to keep the stitches tight to ensure the head is secure.
Next, sew the ears onto the top of the head, positioning them slightly tilted to give the fox a cute expression.
Attach the tail to the back of the body, and sew the paws to the bottom of the body for the perfect finishing touch.
7. Add the Facial Features
Use black yarn or safety eyes to create the fox’s eyes. You can embroider a small nose and mouth with black or pink yarn. If you’re using safety eyes, position them on the head before attaching the face to the body.
If you’d like, you can add a bit of pink or beige yarn to the inner ears to give them more depth and contrast.
8. Final Touches
Once everything is attached securely, give your crochet fox a final trim and fluff. You can even brush the tail a little to give it an extra fluffy look.
Conclusion
And there you have it—your very own crochet fox toy! This little critter will surely bring a touch of woodland magic into your home. Feel free to get creative with the colors and details, or even make a whole family of crochet foxes in different sizes and variations!
Whether you’re a beginner or an experienced crocheter, this project is a delightful way to practice your skills while making something adorable. Happy crocheting!